Sunday, December 4, 2011
Polynesian Meatballs
Tonight's dinner was Polynesian Meatballs with rice. Fast, easy and kid-friendly...see ingredients below...
I start by making the meatballs - preheat oven to 350 degrees - mix ground beef (a couple of pounds) with a couple of Tablespoons of finely chopped onion and season with salt and pepper. Form small bite-sized meatballs and place them on a parchment lined baking sheet (make sure it has a rim). They need to bake about 20 minutes. No extra fat required so much healthier than frying and they taste better! A parchment lined sheet makes clean up easier too.
While your meatballs are baking, start your rice cooking. Just follow the directions on the package. Then chop up half an onion and one green pepper into large but bite-sized pieces. Set aside and finely chop 2 large cloves of garlic and about an inch of fresh ginger root.
In a large pan, next you make the sauce. Mix one cup of water, 1/4 cup of white vinegar, 2 Tbsp of cornstarch, 6 Tbsp of brown sugar, 1/4 tsp dry mustard and 1/2 tsp salt. Whisk to mix well - especially the cornstarch. Turn heat on to medium and add 2 Tbsp of soy sauce, 6 Tbsp of ketchup and a 14 oz can of pineapple with the juice (I like to buy the rings and cut them into large chunks myself). Stir to mix well. The cornstarch will start to thicken the sauce.
Add the vegetables and the meatballs. Stir gently to mix and simmer for about 20 minutes to cook the veg. Stir every 5 minutes or so.
Spoon over rice and serve. This recipe makes 4 servings and took me about an hour start to finish. It could easily be made after work, it tastes great warmed up the next day and this recipe appeals to kids. Enjoy!
Sunday, November 20, 2011
Chicken Quesadillas
Tonight I decided to make chicken quesadillas for dinner. I've never made them before and I didn't have a recipe so I just winged it. They tasted pretty good but they weren't pretty!
For 2 servings, I used one boneless chicken breast, one small pepper and half a medium sweet onion. I started by slicing up the onion and pepper and cooked it in a little olive oil seasoned with some salt and pepper. I set that aside in a bowl and added another couple of tsp of olive oil to the pan. I stirred a tsp of taco seasoning into the oil and stir fried the chicken pieces. I felt it needed a little brightening so I squeezed half a lime into the pan when the chicken was almost done.
I grated some cheddar cheese (It was good but next time I think I'd use Jack or a cheese that had jalapeno added to it for extra flavour). In a clean pan, I added a little olive oil and placed a soft taco in the pan, next a sprinkling of cheese, half of the chicken, onions and peppers, topped with another sprinkle of cheese and another soft taco. Cook until cheese melts and taco is browned. This time I cooked it a little too long but next time, I'll keep a closer eye on it. Serve with a little salsa and sour cream and enjoy!
Stay tuned cause I'm going to start my Christmas baking soon...
Wednesday, November 2, 2011
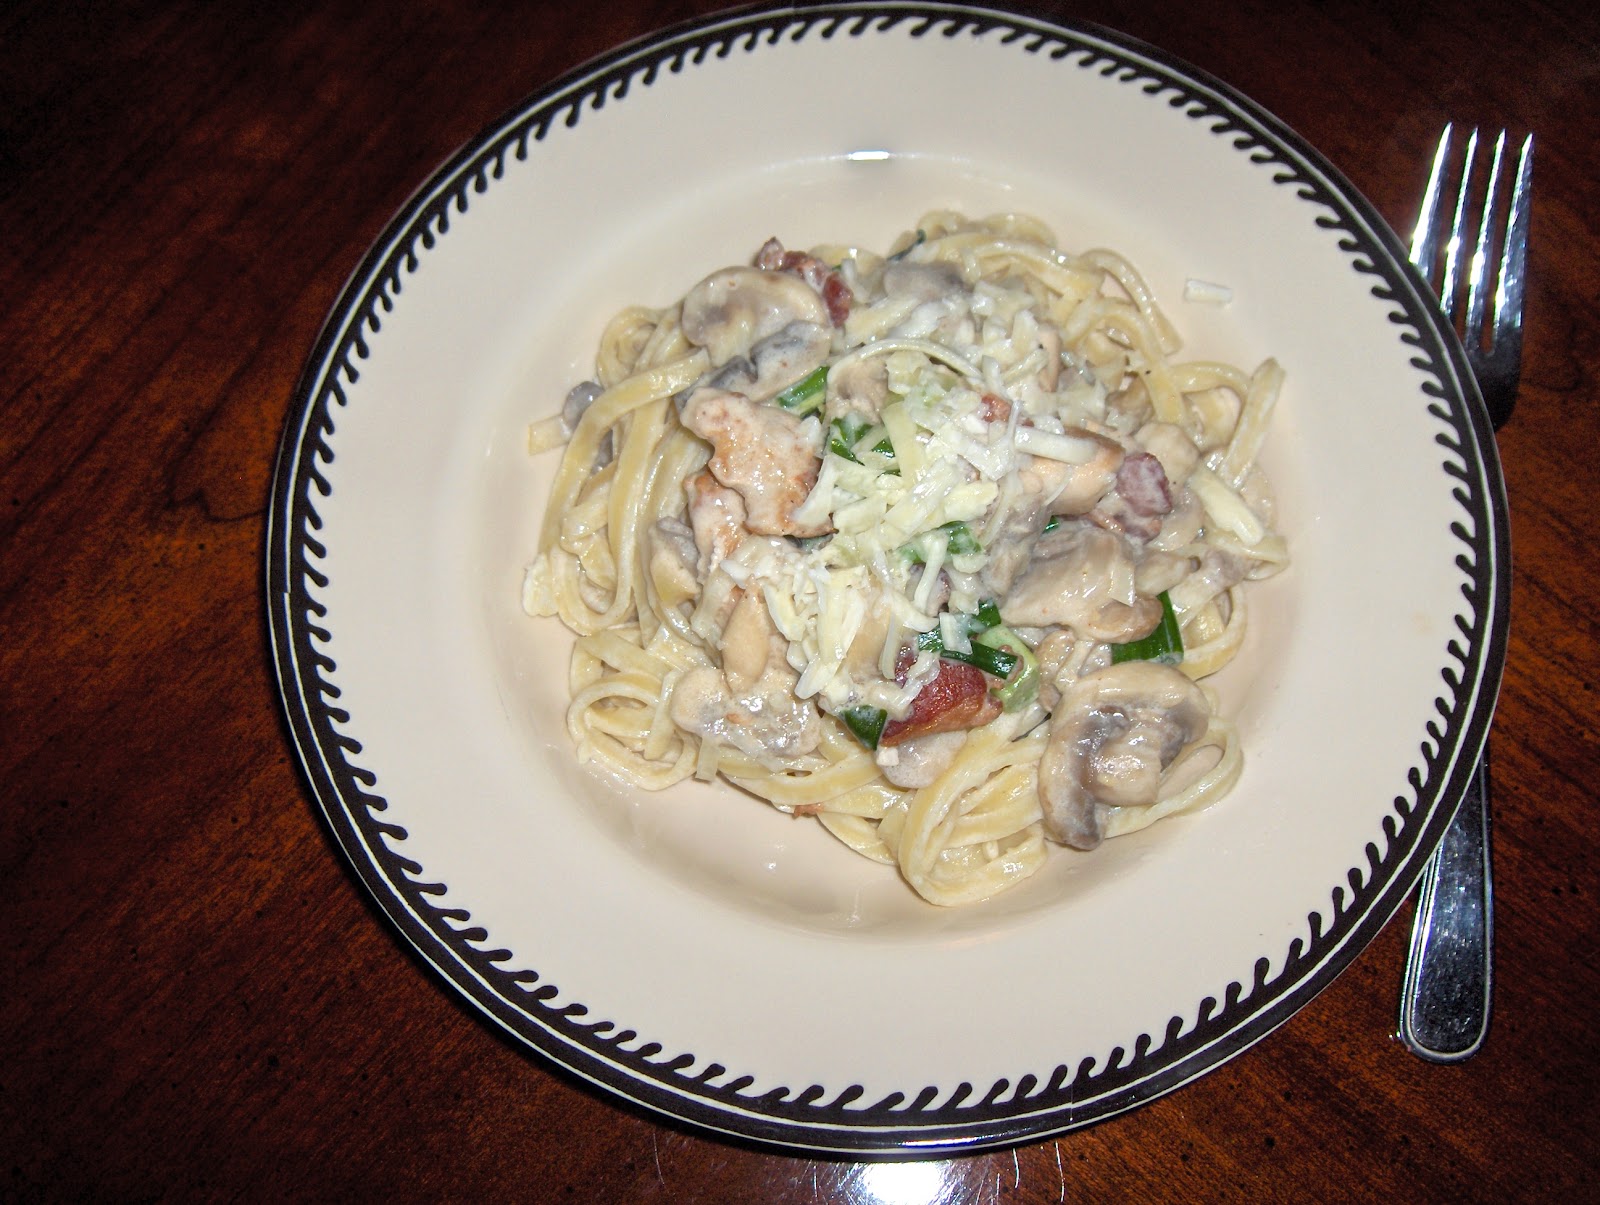
Creamy Fettuccine with Chicken and Mushrooms
Tonight I made pasta for dinner - a fettuccine with chicken and mushrooms in a creamy wine sauce. It was very quick, about a half an hour to make, and scrumptious. The recipe feeds 4 but tastes great for lunch the next day.
Here's the ingredients...
2 boneless, skinless chicken breasts, cut into strips
1 Tbsp olive oil
1 Tbsp butter
2 slices of bacon, cut into pieces
2 cloves of garlic, minced
1 pkg of mushrooms, sliced
1/2 cup white wine
3/4 cup cream
3 green onions, chopped
1 Tbsp flour or cornstarch
2 Tbsp water
salt and pepper
pkg of fresh pasta
grated Parmesan
Start by boiling water in a pot and heating oil and butter in a large frypan. Add chicken to the pan and brown lightly, then add bacon and cook til crisp. Add the garlic and mushrooms and cook for a few minutes. You probably need to add your pasta to the pot right about now.
Once the mushrooms are starting to brown, add the wine and boil til it is reduced by half. Add the cream and bring it to a boil.
Then add the green onions...
Then mix your flour and water and add to pan to thicken. Stir til it starts to form a thick sauce. Add your drained pasta and toss to coat with the sauce. Serve it with sprinkled Parmesan cheese..Enjoy!
Sunday, October 30, 2011
Maple Mustard Salmon
This is a recipe for maple mustard salmon. It is so easy and quick that the first thing you should do is preheat your oven to 400 degrees. Then mix a couple of Tbsp of maple syrup with a large spoon of a grainy mustard. I'm not sure you can get maple syrup depending on where you live. Here in Canada it is plentiful. If you can't, try some honey as a substitute.
Lined a rimmed baking sheet with parchment paper and place a nice large fillet of salmon on it. Spread the maple mustard mixture over it and season with salt and pepper.
This salmon was fairly thin so I baked it for 15 minutes. Just keep an eye on yours so you don't overcook it. Take it out when it is starting to flake and enjoy a dinner with rice and salad that took about 30 minutes to make!
Sunday, October 16, 2011
Fabulous Fried Chicken
Tonight's dinner was fabulous fried chicken. As this is fried, it is a rare treat. The secret is soaking it in buttermilk for 3 or 4 hours at least (you can soak for 24 hours if you'd like). I like to do chicken thighs and I wash and trim them very well. Get rid of all the visible fat and extra skin. Then place them in a casserole and cover with buttermilk. I added a bit more milk after taking the picture so you could see the chicken.
Once you are ready to cook, heat oil in a heavy Dutch oven so it would barely cover the chicken. Then in a large plastic bag, add 2 1/2 cups of flour, 3 tsp of paprika, 1 tsp of cayenne, 2 tsp of salt and 1 tsp of pepper. Mix well to combine. Then using a pair of tongs to keep your fingers dry, add a piece of chicken and shake to coat well.
Gently place the piece of chicken, skin side down into the hot oil. Don't overcrowd the pan or it will lower the temp of the oil and make your chicken soggy. I find I can do 4 thighs at once. They take about 10 minutes and then I turn them over with a clean pair of tongs and cook another 7 to 10 minutes. You'll know they are done when they are mahogany coloured.
ENJOY!
Thursday, October 13, 2011
Bacon-Wrapped Water Chestnuts
This is my nephew Eric's favourite appetizer and I can't blame him - everything is better wrapped in bacon. Use 2 small or one large can of water chestnuts - usually about 30 or 32 chestnuts. Make sure you buy the whole water chestnuts - I made a mistake this time and bought sliced so I had to use 3 slices to make one chestnut - just a little more fiddly to assemble. Drain them and soak them in soy sauce for at least 20 minutes. Soak your toothpicks in water for at least 20 minutes too so they won't burn in the oven. I always soak a few more toothpicks than water chestnuts in case any splinter.
Next you need to partially cook a pound of bacon. You need half a slice of bacon for each water chestnut. The bacon needs to be cooked just enough that it can be wrapped around the chestnut without crumbling.
Pour a cup or so of white sugar into a bowl and dredge each chestnut in the sugar before wrapping it with bacon and securing with a toothpick. Preheat oven to 400 degrees. Place your chestnuts on a rimmed cookie sheet and bake for 20 minutes.
You can serve them right out of the oven but I'm usually making them to take to someone else's party so I put them in a casserole. This can then be microwaved for 2 or 3 minutes til hot. These are amazingly good. So give them a try - even if you think they sound a bit disgusting - you'll be surprised.
Thanksgiving - my favourite holiday!
Thanksgiving dinner is my favourite meal of the year. A gorgeous turkey with all the trimmings - like Christmas without the hassles of shopping, etc. I bought a fresh turkey at Flannigan's - a 17 pounder. I also got my mother to teach me her dressing secrets because my dressing always sucks. We started with stale bread - white and whole wheat - broken into small cubes that were about a half inch square. You'll need 8 to 10 cups of bread. We made a very simple sausage stuffing that was so delish! I bought a pound of sausage meat from Flannigan's and browned that.
I then sauteed 2 stalks of chopped celery and 1 1/2 medium chopped onions in a couple of tablespoons of margarine.
Then the bread cubes were sprinkled with 2 tsp of salt and 1 tsp of pepper and 1 to 1 1/2 Tbsp of ground poultry seasoning. To that we added the vegetables and sausage and mixed well.
The turkey was stuffed front and back and stitched up. It was brushed with 2 Tbsp of melted margarine seasoned with 1 tsp of dried savoury and 1 tsp of poultry seasoning and 1 tsp of paprika. Add salt and pepper. I then placed it in a preheated 325 degree oven in a large roast pan covered with foil. I cooked it slowly from 1:30 pm to 6 pm. It was basted hourly and the foil was removed about 4 pm. At 5, I increased the heat to 350 for the last hour to finish browning it. It was a great dinner with my family contributing - Connie brought apple pie and pumpkin mousse pie, Allyson brought her spinach and pear salad, Cheryl brought turnip and bread, Mom made coleslaw with Grandma's dressing, I did the potatoes and gravy and we started with my bacon wrapped water chestnuts (recipe to follow). It was a memorable meal - sad to see another Thanksgiving weekend over....
Sunday, September 11, 2011
Pesto for the Freezer
The basil is almost waist high in the garden and it's time to harvest it before the frost gets it. I picked about 3 cups of leaves and washed them well...
I peeled a couple of garlic cloves and threw them in the food processor with about a 1/4 tsp of white sea salt and half a cup of toasted almonds. Sometimes I use pine nuts but I'm feeling economical this year. Using the chopping blade, I whirred that around and then added the basil and a Tbsp of extra virgin olive oil. Pulse again...then add about 1/2 cup of olive oil in a steady stream while the machine runs. Next add about 1/4 cup of Parmesan cheese and process again. If the pesto is too tight, add a bit more oil. Store in a container in the freezer and you can spoon out what you need during the winter for your recipes. It'll be a fragrant taste of summer during the cold winter months.
Braised Chicken with Shallots
I am using up some of the million of cherry tomatoes that my garden has been growing. I'm also enjoying the new crop of shallots and using some of the last of my fresh tarragon...
I was planning on using chicken breasts with skin and bones for this but whoever did the butchering... Well they didn't do a very good job. The bones were sharp and jagged and I decided it would just be better to de-bone the the breasts. The cats were happy because I cooked up the fillets and the trimmings for their dinner. For us, I started out by dredging the breasts in flour seasoned with salt and pepper. I fried them in a little oil, skin side down til crispy.
Then I fried up 2 cloves of chopped garlic and 6 shallots that were peeled and halved.
Once they started to brown a little, I added a half a cup of white wine. I deglazed the pan, scraping up the nice brown bits. Then I stirred in a couple of teaspoons of mustard which bubbled and made a nice sticky sauce.
I added about a cup of water and laid the chicken breasts back on top. I then turned the heat down to simmer and covered it and let it cook for 20 minutes. If these breasts still had the bone in, I would have cooked them about 35 minutes.
Then I cut my cherry tomatoes in half, I used about 20 of them for two of us. The chicken is removed to a platter and covered with foil. The tomatoes are added to the sauce and it is brought to a boil. I then spooned it over the chicken and topped it with torn tarragon leaves. Delish!
Peanut Butter Cookies
I made some peanut butter cookies for the freezer this afternoon. Of course I baked a few for dessert tonight. Start by preheating the oven to 350 degrees.
Ingredients
1 cup hard margarine or butter
1 cup white sugar
1 cup of brown sugar
2 eggs
1 cup of peanut butter
2 to 2 1/2 cups of all-purpose flour
1 tsp baking powder
pinch salt
Start by creaming margarine with the 2 sugars and then the eggs. After that mix in the peanut butter.
Sift the dry ingredients together (although I admit I just toss it all into the Kitchenaid mixer - too lazy to sift!) and add to wet ingredients. You might want to start with 2 cups of flour and then add more if the dough is too soft. You can drop spoonfuls onto a baking sheet lined with parchment paper and bake 12 to 15 minutes. You can also refrigerate the dough until it stiffens a bit and make rolls for the freezer (I did this too). Then you can slice rounds right from the freezer and bake them off whenever you need a treat.
It's nice to have these in the freezer for a quick dessert...
Saturday, September 10, 2011
Yorkshire Pudding
Yorkshire pudding is one of my family's favourites. I remember as a kid being so happy when Mom made Yorkshire pudding with our weekly roast beef and apple pie Sunday dinners. We really were spoiled - we just didn't know it! Of course, she made them in muffin tins and I have special Yorkshire pudding pans. She always made them at the last minute (for a family of 6 kids no less) while I make them up in advance and warm them up while I'm preparing the gravy. Nevertheless, they still taste like childhood and the leftovers freeze for another day.
Ingredients
1 1/4 cups milk
1 cup of all-purpose flour
pinch of salt
3 eggs
I like to use my batter bowl with the spout. Whisk eggs and milk together and slowly add the dry ingredients and whisk to a smooth batter. You can also mix the batter in a blender or food processor. Let it rest for 30 minutes while you are preheating the oven to 450 degrees and warming the pans. It'll make 10 to 12 Yorkshire puddings.
Put a drop of oil into each cup of your pan and using a pastry brush, spread the oil over the bottom and sides of the cups.
When the oven is almost warm enough, put the oiled pans in to heat for about 5 minutes. Take them out when they are smoking hot and pour batter in half way up each cup.
They will hiss and bubble up a bit. Get them in the oven quickly and bake them for 20 minutes without opening the oven door. Then take them out and get them out of the pans and onto their sides on a rack. They will collapse quickly if you leave them in the pan.
Once they are cooled, you can package up any that aren't needed for dinner and freeze them. They will thaw quickly and you can reheat them after the roast is out of the oven and you are making the gravy. Enjoy your dinner!
Butternut Squash and Pear Soup
The fall harvest has started so I've started making and freezing dinners like a squirrel storing nuts. So I've made a big batch of butternut squash and pear soup this afternoon. It's delicious and healthy - a good combination.
Ingredients
1 Tbsp butter
1 onion, peeled and chopped
1 carrot, peeled and chopped
1 large butternut squash, peeled and chopped
1 pear, peeled and chopped
6 cups chicken stock
2 bay leaves
1/2 tsp fresh nutmeg
salt and pepper to taste
Start by peeling and chopping the onion and carrot. Melt the butter in a large pot and cook the onion and carrot until it starts to caramelize. Season with salt and pepper.
Peel and chop the butternut squash and the pear...
Once the carrot and onion have started to brown, pour in the chicken stock. Add the butternut squash, the pear, bay leaves and nutmeg. Simmer until the vegetables are soft, about an hour...
Once the soup is done, let it cool and blend it in batches until smooth and creamy. Adjust seasoning - I usually add some more pepper and then I divide into containers for lunches and dinners.
This soup freezes really well and can be thawed in the fridge or the microwave if you're in a hurry. When serving, it is nice to swirl a little cream in the top or drizzle a little olive oil and top with homemade croutons. It's also nice if you fry up some rings of shallots or fresh sage leaves until they are brown and crispy. I plan on topping mine with some crispy sage leaves and serving with garlic cheese bread for an easy Friday supper. Enjoy!
Subscribe to:
Posts (Atom)